# Lab Notes: Build Your DTN Node and join the IPNSIG's operational DTN
**Workshop on Empowering Connectivity: Bridging Space and Earth with DTN**
ICTP, Trieste, Italy
[](https://indico.ictp.it/event/10867)https://indico.ictp.it/event/10867
*September 22-26, 2025*
Author: Samo Grasic, samo@grasic.net
BITLY: http://bit.ly/4pADYUo
Link to the Interplanetary DC mailing list:[Link](https://mail.intgovforum.org/mailman/listinfo/dc-interplanetary_intgovforum.org)
Link to IPNSIG's Bundle board: [https://openipn.org/bundleboard/](https://openipn.org/bundleboard/)
Link to IPNSIG's Operational Network Status Page: [https://openipn.org/status.html](https://openipn.org/status.html)
Get your Free IPN number: [https://openipn.org/](https://openipn.org/)
How to joing IPNSIG's PWG Group: [Link](https://doc.openipn.org/Kqnh9bIHSC6GD6-g8ZLnEg#)
List of available DTN implementations: [Link](https://doc.openipn.org/FPgVWp1wSIq466sIldOVWQ#)
Join DTNWorkshop Signal Group
ION Documentation [Link](https://ion-dtn.readthedocs.io/en/ion-open-source-4.1.4-a.1)
Bundle Music: [Link](https://suno.com/s/LkUwy1fjpBSPXrqc)
NEW NOTES:
[Update your dtnex to the latest version](https://doc.openipn.org/GuPWSf5zThyeXOp0UywVsA#
)
[Configure ION's memory](https://doc.openipn.org/4DRuZCzJTcm-nZwJNjcLWw#
)
[TOC]
List of pre-registered ipn numbers for the workshop. For additional ipns go to: [https://openipn.org/](https://openipn.org/)
## Getting Started with the Raspberry Pi 5
This lab begins with a live introduction of what the Interplanetary Overlay Network (ION) is, how it works at a high level, and the steps we will take to image a Raspberry Pi-5, build and install ION DTN software, and run connectivity, bundle transfer, and file transfer tests.
ION-DTN may be run and tested on a single computer, where you have two instances of ION-DTN running and they can talk to one another over localhost. For this demo, we'll start with only one computer and later show how to configure one computer to talk to another computer.
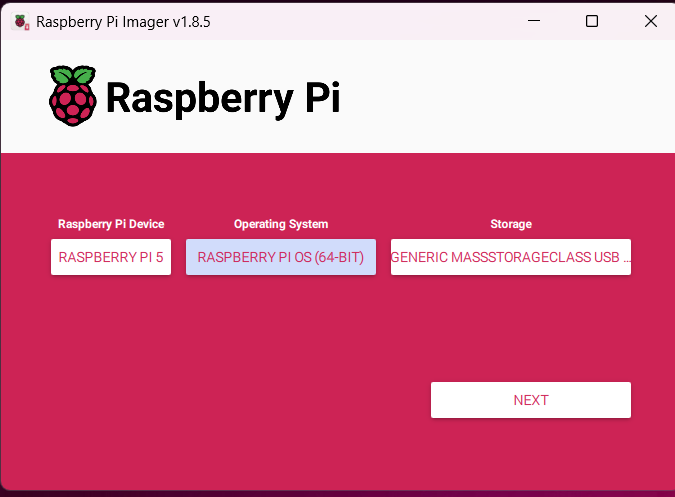
### Create a Raspberry Pi Image
* Insert your empty SD card into the SD card reader
* Download and install Raspberry PI Imager from [Raspberry PI Imager]( https://www.raspberrypi.com/software/)
* Configure and burn PI Image on SD Card
1. Choose *Raspberry PI 5* as OS and *Raspberry Pi OS with Desktop*
2. Use the following OS Configuration
3. Set hostname as: **piYOURID**
4. Set username as: **pi**
5. Set password as: **bundle** (do not forget to change it after the workshop)
6. Set WIFI name: **DTNWorkshop** (only if you are using WIFI)
7. Set WIFI password: **bundle2025**
8. Burn image to SD card and insert it to your PI5 board
### Update Your Raspberry Pi
After your first boot login to your pi, update it:
```
sudo apt update
sudo apt upgrade
```

Note this process can take approx. 10 min.
### Connect to the Tailscale VPN
For the purpose of this workshop a custom TailScale VPN network was created in order to simplify DTN network configuration once the paricipants return to their home institutions/home.
Run the following command:
```
curl -fsSL https://tailscale.com/install.sh | sh
sudo tailscale up --auth-key=tskey-kcTqEuQMXL11CNTRL
```

After your node will be successfuly added to the TailScale network, you can check your local ip address using a command:
```ip address```
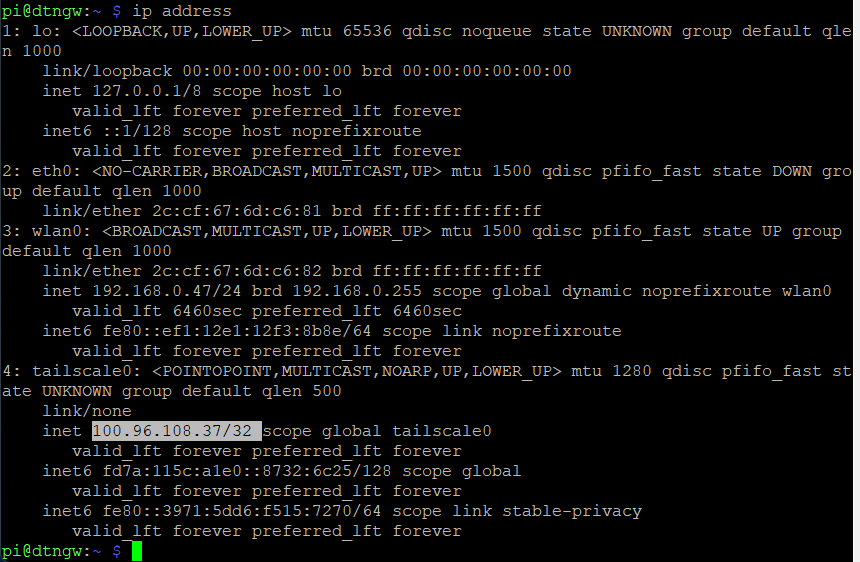
Note down your Tailscale adapter address as you will need it to configure your ION.
## Install the IONe DTN Implementation
### Download the IONe DTN Implementation
Create and enter your local DTN work folder
```
mkdir dtn
cd dtn
```
Use the following commands to install IONe implementation
```
sudo apt-get install git
git clone https://git.code.sf.net/p/ione/code ione-code
```
### Build IONe
```
cd ione-code/
git branch ione-1.1.0
git checkout ione-1.1.0
git pull origin ione-1.1.0
sudo apt-get install build-essential
sudo apt-get install autoconf
sudo apt-get install automake
automake
./configure
make
sudo make install
sudo ldconfig
cd ..
```
### Configure Your Node
If you have't received your IPN node number visit the following webpage and request your free IPN number:
[Get your own IPN number](https://openipn.org/)
Preferably use your allocated number from the workshop host, e.g: ***ipn:268485000***
Download the ION's initial configuration file from here:
[https://openipn.org/inithostfile.rc
](https://openipn.org/inithostfile.rc)
Use the following commands to download and rename it to match your assigned IPN nubmer and open it in text editor:
```
wget https://openipn.org/inithostfile.rc
wget https://openipn.org/inithostfile.ionconfig
mv inithostfile.rc host268485NNN.rc
mv inithostfile.ionconfig host268485NNN.ionconfig
nano host268485NNN.rc
```
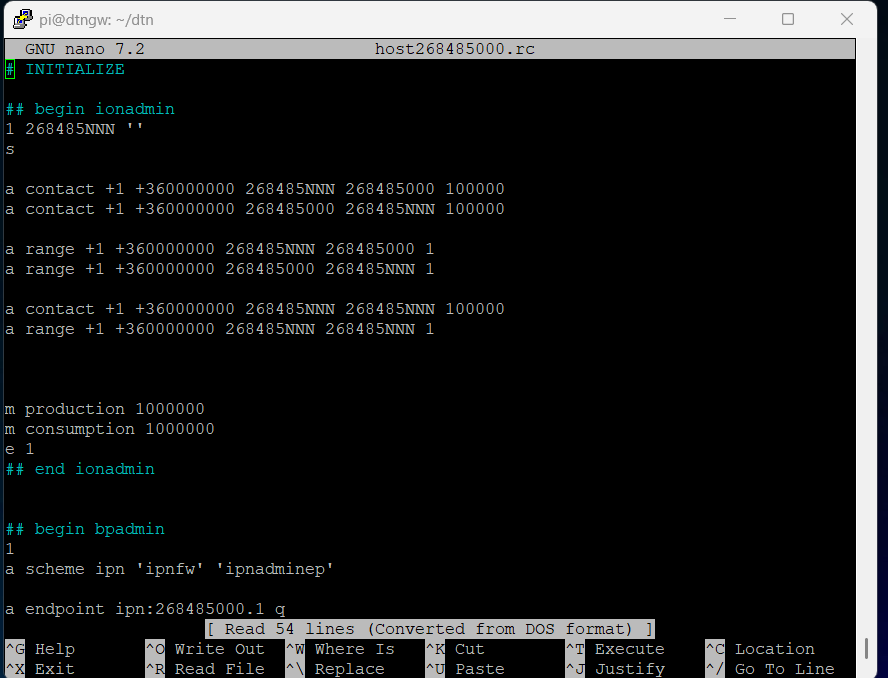
You need to edit and change all the lines containing the 268485NNN to match your allocated IPN number to in ION configuration file. This include contacts, ranges and endpoints.
E.g: 268485NNN should be chaneged to 268485001 for node 268485001:
a contact +1 +360000000 268485001 268485001 100000;
In addition change values for the range and endpoints.
Here is an example of node ipn:268485001 configuration file:
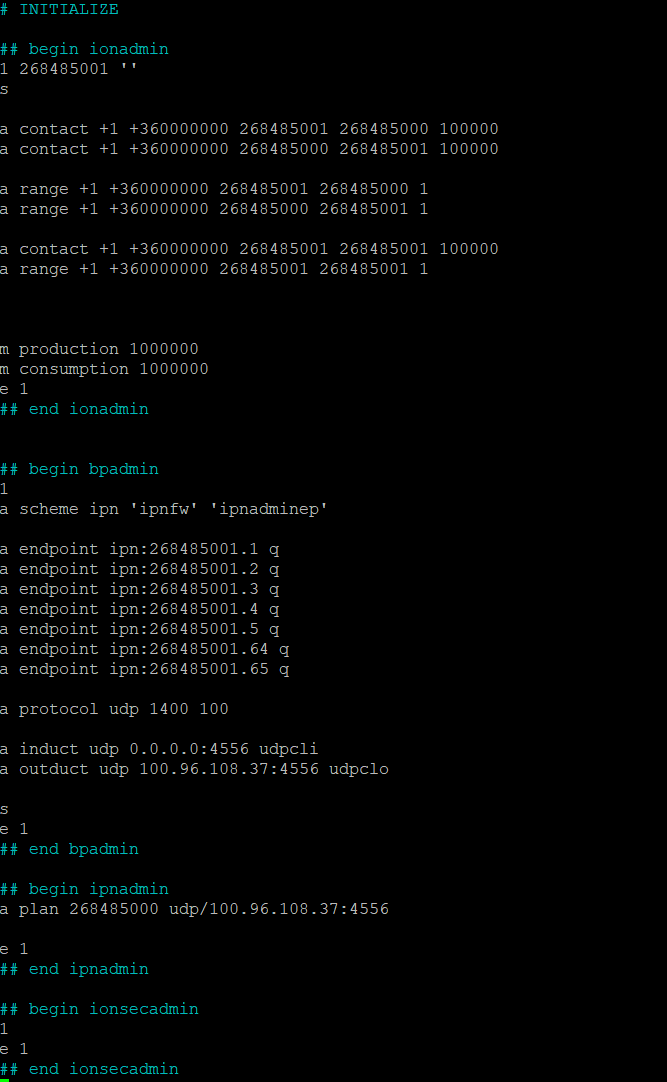
Note: After you are done with editing, press CTRL+S to save the file and CTRL+C to exit nano editor.
### Start ION
To start your ION using the following command:
```
ionstart -I host268485NNN.rc
```
Note: To stop or restart ion instance use the **ionstop** or **killm** command.
If your configration was parsed succesfully you should get this output:
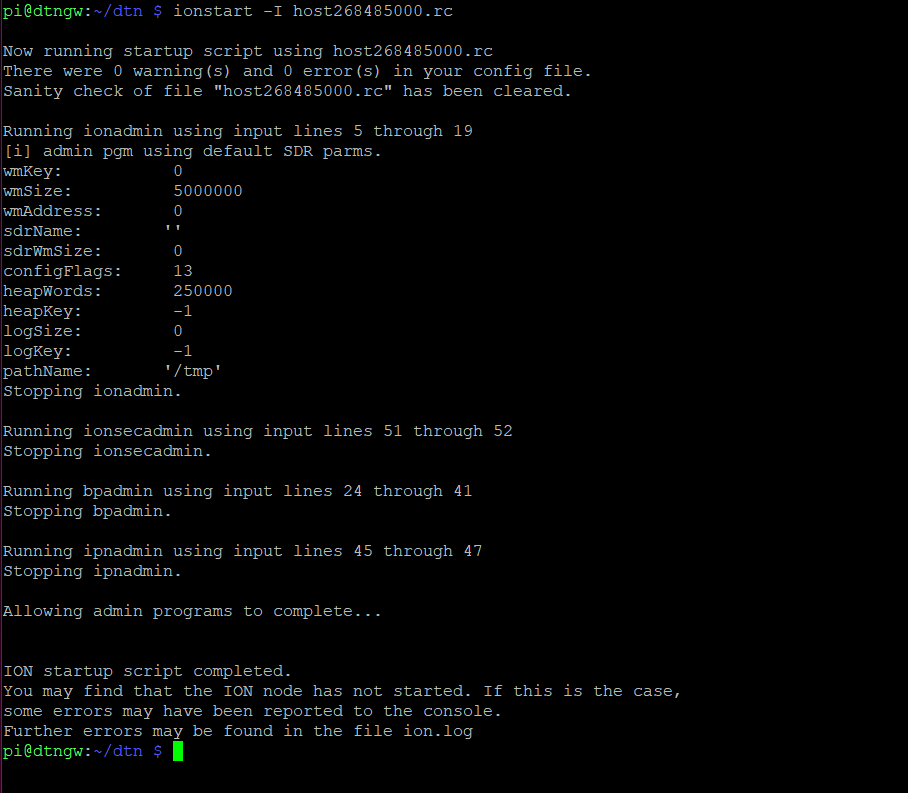
At this point your ION node should be running. Your node should have running a local loopback connection and a contact to one of the IPNSIG's public node (ipn:268485000).
## Getting familiar with ION
IONe DTN implementation includes basic tools and services to test and debug your DTN network.
#### bping - Send and receive Bundle Protocol echo bundles
bping sends bundles from srcEID to destEID. If the destEID echoes the bundles back (for instance, it is a bpecho endpoint), bping will print the round-trip time. When complete, bping will print statistics before exiting. It is very similar to ping, except it works with the bundle protocol.
Before using bping, start the bpecho service on the node that you are trying to ping. Note, that all the nodes that are running the DTNEx service (will be used later on) are having a bpecho service running at service nr. 12161. To start the bpecho service run the following command in a second terminal window and keep the service running:
```
bpecho ipn:268485NNN.4
```
On the main terminal window run the bping using this command (example to bping/test local loopback, note that you need to use diferent service number for local bping):
```
bping ipn:268485NNN.3 ipn:268485NNN.4
```

After the worshop host will start the bpecho service, you should be also able to ping the IPNSIG's public DTN gateway on ipn:268485000.12161. Use the following command:
```
bping ipn:268485NNN.3 ipn:268485000.12161
```
### Add a New Neighbor Contact
First find another workshop participant and exchange the **ipn** and **tailscale ip** numbers.
Start the nano editor in order to add another contact to your ION node you need to open your ION configuration file (using the nano host268485NNN.rc command) and follow these steps:
- [ ] Add a new pair of contacts under the ionadmin section:
```
a contact +1 +360000000 YOUR_OWN_IPN YOUR_NEIGHBOUR_IPN 100000
a contact +1 +360000000 YOUR_NEIGHBOUR_IPN YOUR_OWN_IPN 100000
```
- [ ] Add a new pair of ranges under the ionadmin section:
```
a range +1 +360000000 YOUR_OWN_IPN YOUR_NEIGHBOUR_IPN 1
a range +1 +360000000 YOUR_NEIGHBOUR_IPN YOUR_OWN_IPN 1
```
- [ ] Add a new udp outduct under the bpnadmin section:
```
a outduct udp YOUR_NEIGHBOUR_TAILSCALE_IP:4556 udpclo
```
- [ ] Add a new plan under the ipnadmin section:
```
a plan YOUR_NEIGHBOUR_IPN udp/YOUR_NEIGHBOUR_TAILSCALE_IP:4556
```
After saving your edited configuration file you can restart your ion using the following commands:
ionstop
```
ionstop
ionstart -I host268485NNN.rc
```
### Exchange a DTN Message with a Neighbor
Once you and your neighbour have **both** succesfully added a new contact and restarted their ions, you should be able to exchange your first message bundles. To do so you can use the **bpsource** and **bpsink** commmands.
To receive a bundle with a text message on your receiving node start the bpsink service using the following command and keep it running (it will display received bundles from any nodes set to service port nr. 1):
```
bpsink ipn:268485NNN.1
```
On a sending side you can send a bundle with the message using the follwoing command
```
bpsource ipn:268485NNN.1 "This is a test message!"
```
If a contact was set right your should be able to see the message on the received node. Example:

After you have succesfuly received a bundle on one node, reverse used commands with your neighbour and test if the contact is working the other way as well. As the DTN architecture suppors one way / directional contact, it is always a good idea to test if the contact works both ways. As bping needs bi-derectional contact to work, bpsink and bpsorce commands can be helpfull to detect and debug broken/one way contacts.
**Once you are done with this step, please add one more contact with a new neighbour.**
### Build and Test a Contact Graph
In order to reach nodes in the DTN network that are not direct neighbours, you need to
For instance, there is a node
### Example: Building a Contact Graph with Three Nodes
When a node must reach a destination that isn’t its direct neighbor, **ION** needs to know **which neighbor to forward bundles to, and when links are available**.
This is captured in a **contact graph**, built from:
- **Contacts** — time-bounded link opportunities with a data rate.
- **Ranges** — one-way light time (OWLT) between directly connected nodes.
**Example topology**: node `ipn:268485NNN` reaches node `ipn:268484612` **via** the intermediate node `ipn:268485000`.
#### Topology (visual)
```mermaid
graph LR
A["ipn:268485NNN"] <--> B["ipn:268485000"]
B <--> C["ipn:268484612"]
%% A reaches C via B (multi-hop)
```
You add **contacts** and **ranges** for each **direct** link that the host participates in.
Below, `+1` is “start now + 1 s”, `+360000000` is a long horizon (demo-friendly), `100000` is an example data rate (bps), and OWLT is set to `1` second for simplicity. Adjust to your lab setup.
#### On your own node (`ipn:268485NNN`):
- [ ] **Add a new pair of contacts** under the `ionadmin` section:
```
a contact +1 +360000000 268485NNN 268485000 100000
a contact +1 +360000000 268485000 268485001 100000
a contact +1 +360000000 268485001 268484612 100000
```
- [ ] **Add a new pair of ranges** under the `ionadmin` section:
```
a range +1 +360000000 268485NNN 268485000 1
a range +1 +360000000 268485000 268485001 1
a range +1 +360000000 268485001 268484612 1
```
**NOTE:** This setup provides **one-directional** path only. In order to add bi-directional path additional set of contacts and ranges should be added.
**NOTE2:** This contact graph should be added to **all the nodes** on the path (already done by the workshop host for this test).
Once the worshop host starts the bpsink command on the ipn:268484612 node, you can test your set-up by sending a test bundle with the message using the following command:
```
bpsource ipn:268485NNN.1 "Sent from my 268485NNN node!"
```
### Good to Know About ION
#### ION’s Bundle Storage
ION supports two methods for storing bundles:
1. **Memory**
2. **File**
To change the default configuration, include the `.ionconfig` file in the `hostXXXXX.rc` file.
#### Checking Bundle Storage
You can monitor bundle storage with the **sdrwatch** utility:
```
Usage: sdrwatch <sdr name> [ -t | -s | -r | -z ] [<interval> [<count> [verbose]]]
-t Print a trace of space allocation and release (default)
-s Print stats for the current transaction
-r Reset log length high-water mark and then print stats for the current transaction
-z Print stats for the current transaction and print ZCO status after that transaction ends
```
#### Listing Stored Bundles
To list the bundles currently stored, use the **bplist** utility:
```
bplist
```
#### Important Note
Keep track of bundle storage carefully. If the storage overflows, ION may lock up.
When configuring, pay close attention to:
- Storage size
- Expected traffic volume
- Typical bundle sizes
- Time-to-live (TTL) of bundles
## Join the IPNSIG's PWG Operational DTN
### Build your Contact Graph using DTNEx
When your ION's contact graph grows you will might find it hard to manage manually and distribute it over your entire DTN. DTNEx service was developed to automatically manage your contact graph in your deployed network. Instead of building and updating a complete contact graph evertime your network topography changes, DTNEx require from you only to configure and manage ION's contacts with your direct neighbours.
In addtition, DTNEx starts the bpecho service on the service nr. 12161. That allows you and other nodes to bping anyone on the network.
### DTNEX – DTN Network Information Exchange
DTNEX is a lightweight companion to **ION-DTN** that distributes **contact plans** (who can talk to whom, and when) and **node metadata** across a Delay Tolerant Network. Nodes periodically exchange compact, authenticated **CBOR** messages so each node can build and maintain a **local contact graph** of the wider DTN—useful for routing and operator visibility.
### How DTNEX works
1. **Collect**
DTNEX reads the local ION contact plan (your direct neigbours) and the node’s metadata (name/contact and optional GPS) from `dtnex.conf`.
2. **Announce**
At a fixed cadence (`updateInterval`) it sends **Contact** and **Metadata** messages as BPv7 bundles to a well-known service (default **12160**).
3. **Validate & merge**
On reception, messages are HMAC-verified, expiry-checked, and de-duplicated via a **3-byte nonce** cache. Valid information is merged into the node’s local view; an optional GraphViz topology can be rendered.
4. **Propagate**
Novel messages are forwarded to neighbors (excluding origin and immediate sender) to rapidly spread updates across the DTN.
#### Extended CBOR protocol specification
All DTNEX PDUs are **CBOR arrays** with a common envelope and an HMAC (SHA-256, **truncated to 8 bytes**) for authentication, plus **replay protection** using a 3-byte nonce.
#### Common envelope (all messages)
```cbor
[
version, ; uint – protocol version (e.g., 2)
type, ; uint – 1=Contact, 2=Metadata
timestamp, ; uint – seconds since Unix epoch (creation)
expireTime, ; uint – seconds since Unix epoch (valid until)
origin, ; uint – node ID that created the message
from, ; uint – node ID that forwarded/sent it
nonce, ; bstr – 3-byte random nonce
payload, ; tbd – type-specific data (array or map)
hmac ; bstr – 8-byte HMAC-SHA256 tag (truncated)
]
```
**Notes**
- The **HMAC** is computed over every field **except `hmac`** using a pre-shared network key (`presSharedNetworkKey`).
- **Replay protection** uses `(origin, nonce)`; duplicates are dropped.
- Messages are discarded when `now > expireTime`.
#### Contact message
Conveys a contact opportunity (link) between two nodes.
**Payload (CBOR array):**
```cbor
[nodeA, nodeB, duration, datarate, reliability]
```
| Field | Type | Description | Example |
|--------------|------|-----------------------------------------------|---------------|
| `nodeA` | uint | First endpoint node ID | 268484800 |
| `nodeB` | uint | Second endpoint node ID | 268484801 |
| `duration` | uint | Contact validity (minutes, 0–65535) | 1440 |
| `datarate` | uint | Expected throughput (bytes/sec) | 100000 |
| `reliability`| uint | Operator-defined reliability (1–100 typical) | 100 |
**Full example (JSON-ish rendering of CBOR array):**
```json
[
2, // version
1, // type = Contact
1694885400, // timestamp
1694887200, // expireTime
268484800, // origin
268484800, // from
"A1B2C3", // nonce (3 bytes, shown here as hex string)
[268484800, 268484801, 1440, 100000, 100],
"1234567890ABCDEF" // HMAC-SHA256 (8 bytes, hex)
]
```
#### Type 2 — Metadata message
Carries human-friendly node info and optional GPS (integers scaled ×1,000,000).
**Payload (CBOR map):**
```cbor
{
1: nodeId, ; uint
2: "NodeName", ; tstr (≤ ~24 chars recommended)
3: "ops@example", ; tstr (≤ ~24 chars recommended)
4: latitudeInt, ; int – optional: latitude × 1_000_000
5: longitudeInt ; int – optional: longitude × 1_000_000
}
```
**Full example (JSON-ish rendering of CBOR array):**
```json
[
2, // version
2, // type = Metadata
1694885400, // timestamp
1694887200, // expireTime
268484800, // origin
268484800, // from
"D4E5F6", // nonce
{ "1": 268484800, "2": "Gateway-Node", "3": "admin@net.com", "4": 59334591, "5": 18063240 },
"FEDCBA0987654321" // HMAC (8 bytes)
]
```
### Authentication, replay protection, and expiration
- **HMAC calculation**
- **Key**: `presSharedNetworkKey` from `dtnex.conf` (use a strong random value in production).
- **Input**: the CBOR encoding of all fields except the `hmac` field.
- **Algorithm**: HMAC-SHA256, **truncated to the first 8 bytes**.
- **Replay protection**
- Each node caches `(origin, nonce)` pairs for a window aligned with `expireTime`.
- Duplicates are dropped; forwarding excludes `origin` and the current `from`.
- **Expiration**
- Receivers must discard messages when the current time exceeds `expireTime`.
- Choose `bundleTTL ≥ updateInterval` and set `expireTime` consistently with `contactLifetime`.
### Build & install DTNEX
#### Requirements
- **ION-DTN 4.1.0+** system libraries: `libbp`, `libici`
- **OpenSSL dev** libraries (HMAC)
- **Build tools** (GCC/Make)
- **Optional**: GraphViz (for topology diagrams)
Debian/Ubuntu/Raspberry Pi OS:
```bash
sudo apt update
sudo apt install -y build-essential libssl-dev graphviz
```
```bash
git clone https://github.com/samograsic/ion-dtn-dtnex
cd ion-dtn-dtnex
./build_standalone.sh
sudo make install # installs /usr/local/bin/dtnex
```
#### Configuration (`dtnex.conf`)
Place the file in your chosen /home/pi/dtn working directory.
Edit the dtnex.conf file using nano. Change the nodemetadate value to match your node name, contact and location
```
nano /home/pi/dtn/dtnex.conf
```
An example of dtnex.conf file:
```ini
# Cadence & lifetimes
updateInterval=1800 # seconds between announcements
bundleTTL=1800 # bundle lifetime (sec) – keep > updateInterval
contactLifetime=3600 # how long received contacts remain valid (sec)
contactTimeTolerance=1800 # allow this much clock skew (sec)
# Security
presSharedNetworkKey=open # CHANGE THIS in production
# Node metadata (≤ ~128 chars)
nodemetadata="Node-01,ops@example.com,YourCountry"
# Optional GPS (decimal degrees)
#gpsLatitude=59.334591
#gpsLongitude=18.063240
# Visualization (optional)
createGraph=false
graphFile=/opt/dtnex/contactGraph.png
# Runtime
serviceMode=false # or use --service flag
debugMode=false
noMetadataExchange=false
```
#### Running
```bash
# Ensure ION is running first
cd /home/pi/dtn # normal
dtnex --debug # verbose
```
## Automating ION and DTNEx Startup on your PI
### ION DTN Watchdog (ionwd)
A monitoring and recovery script for ION DTN (Delay-Tolerant Networking) that automatically detects and resolves unresponsive or locked ION instances.
#### Features
- **Health Monitoring**: Continuously monitors ION DTN health using `bpadmin` commands
- **Automatic Recovery**: Detects unresponsive states and automatically restarts ION
- **Simple Logging**: Logs restart events with timestamps and reasons
- **Signal Handling**: Graceful shutdown on SIGINT/SIGTERM
#### How It Works
The watchdog performs periodic health checks by sending a `list` command to `bpadmin` and expecting the "List what?:" prompt. If ION doesn't respond within the timeout period or behaves unexpectedly, the watchdog:
1. Logs the restart event with timestamp and reason
2. Stops ION using `killm`
3. Restarts ION using `ionstart`
4. Verifies the restart was successful
5. Logs the restart result
#### Installation
##### Download from GitHub:
```bash
cd /home/pi/dtn
git clone https://github.com/samograsic/ionwd.git
cd ionwd
```
#### Configuration
Edit the configuration section at the top of `ionwd.sh` using command:
```
nano ionwd.sh
```
```bash
ION_CONFIG_FILE="/home/pi/dtn/hostXXXXXXX.rc" # ION config file
LOG_DIR="/home/pi/dtn" # Base directory for ionwd.log
START_SLEEP=5 # Seconds to wait after stop/start
WATCH_INTERVAL=15 # Seconds between health checks
TIMEOUT=2 # Timeout for bpadmin responses
```
#### Usage
##### Make the script executable:
```bash
chmod +x ionwd.sh
```
#### Run as a systemd service:
1. **Create a systemd service file:**
```bash
sudo nano /etc/systemd/system/ionwd.service
```
2. **Add the following content (adjust paths and user as needed):**
```ini
[Unit]
Description=ION DTN Watchdog
After=network.target
Wants=network.target
[Service]
Type=simple
User=pi
Group=pi
WorkingDirectory=/home/pi/dtn
ExecStart=/home/pi/dtn/ionwd/ionwd.sh
Restart=always
RestartSec=10
StandardOutput=null
StandardError=null
[Install]
WantedBy=multi-user.target
```
**Note:** Replace `pi` with your actual username and adjust paths to match your installation.
3. **Enable and start the service:**
```bash
sudo systemctl daemon-reload
sudo systemctl enable ionwd.service
sudo systemctl start ionwd.service
```
4. **Check service status:**
```bash
sudo systemctl status ionwd.service
```
#### Logging for ION Watchdog
- **Main log**: `$LOG_DIR/ionwd.log` - Contains timestamped watchdog activities and restart events
Example log entries:
```
2025-09-16 10:30:45 - Ion watchdog started. Monitoring every 15s (timeout 2s).
2025-09-16 10:35:20 - ION RESTART: timeout
2025-09-16 10:35:25 - Ion restart successful. Health check passed.
2025-09-16 11:42:10 - ION RESTART: unresponsive-or-not-running
2025-09-16 11:42:15 - Ion restart attempted but health check FAILED.
```
### Install DTNEx as a Systemd Service
1. **Create the unit** `/etc/systemd/system/dtnex.service`
```bash
sudo nano /etc/systemd/system/dtnex.service
```
Add this to the dtnex.service file
```
[Unit]
Description=DTNEX - DTN Network Information Exchange
Requires=ionwd.service
After=ionwd.service
[Service]
Type=simple
User=pi
Group=pi
WorkingDirectory=/home/pi/dtn
ExecStartPre=/bin/sleep 15
ExecStart=dtnex
Restart=always
RestartSec=10
[Install]
WantedBy=multi-user.target
```
> If your ION unit name differs from `ion.service`, adjust `After=` and `Requires=` accordingly.
3. **Enable & start**
```bash
sudo systemctl daemon-reload
sudo systemctl enable dtnex.service
sudo systemctl start dtnex.service
```
4. **Verify**
```bash
systemctl status dtnex.service
journalctl -u dtnex.service -f
```
---
## Build Your First DTN Application (Sensor Example)
In this workshop exercise, we will set up a DTN node that periodically sends out measured data from a **BME280 sensor**.
The steps are as follows:
1. Wire the BME280 sensor to your **Raspberry Pi 5** using the **I²C port**.
2. Enable the I²C port on the Raspberry Pi.
3. Install the BME280 service that reads sensor values.
4. Build a script that bundles the collected data and sends it to another node over the **IPNSIG DTN network**.
**Resources:**
- [BME280 Sensor on Amazon](https://www.amazon.de/-/en/BME280-Barometric-Temperature-Humidity-Pressure/dp/B0C4L8BKJP/258-7284141-1086539?pd_rd_w=bOS0w&content-id=amzn1.sym.cdb3cd5b-5b29-4346-8344-90969a97eb77&pf_rd_p=cdb3cd5b-5b29-4346-8344-90969a97eb77&pf_rd_r=5WJ3WMQQ3G4FREK204D5&pd_rd_wg=aDxgp&pd_rd_r=ab957797-c5fb-49fd-9a91-53d28069e292&pd_rd_i=B0C4L8BKJP&psc=1)
- [Wiring and Enabling I²C on Raspberry Pi](https://randomnerdtutorials.com/raspberry-pi-bme280-python/)
### Wire the BME280 Sensor
This sensor communicates using I2C communication protocol, so the wiring is very simple. You can use the default Raspberry Pi I2C pins as shown in the following table:
| BME280 | Raspberry Pi |
|--------|--------------|
| Vin |3.3V |
| GND |GND |
| SCL |GPIO 3|
|SDA |GPIO 2|
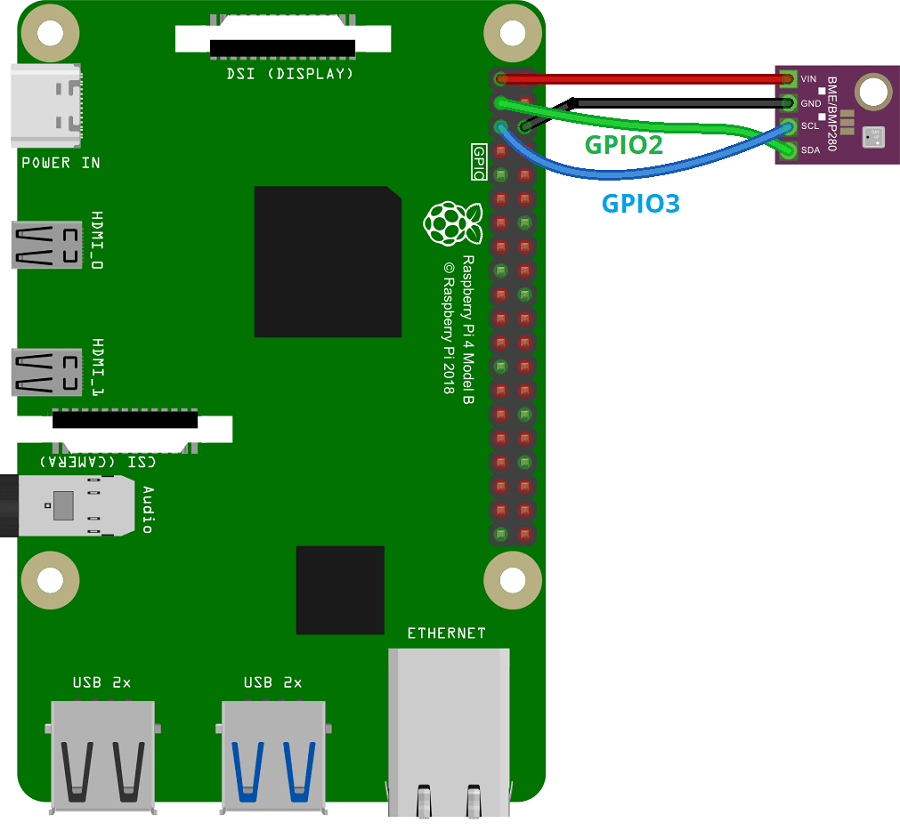
[Source](https://randomnerdtutorials.com/raspberry-pi-bme280-python/)
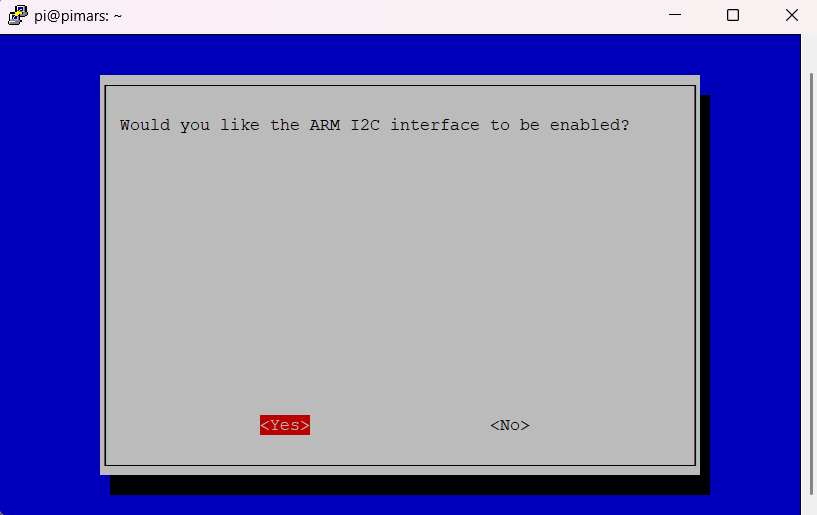
### Enable I2C interaface on your PI
Next, you need to enable the I2C interface on PI using follwing this procedure:
```
sudo raspi-config
```
The following menu will open, select Interface Options.
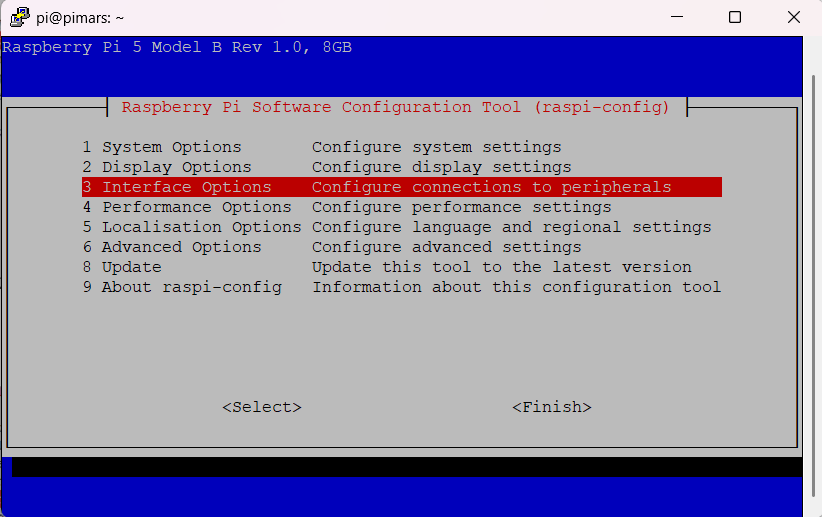
Select the I2C option.
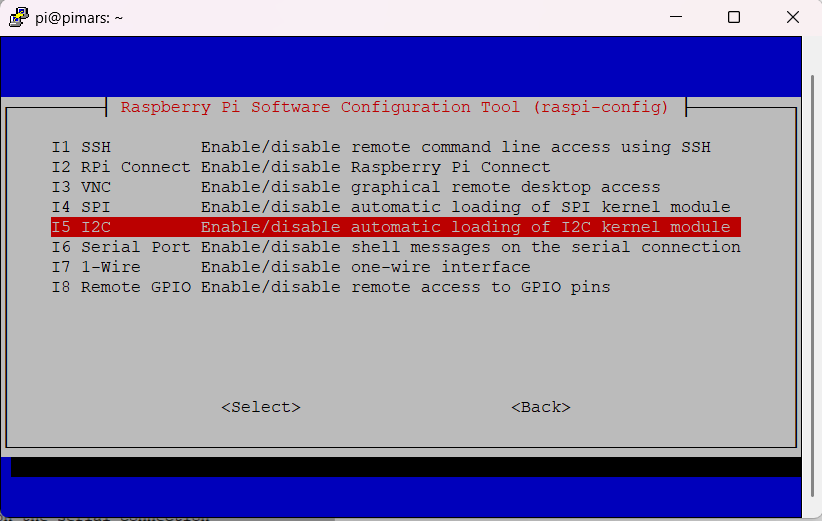
Enable I2C by selecting Yes.
After enabling I2C, reboot your Raspberry Pi by running the following command:
```
sudo reboot
```
You can check if you have wired your sensor correctly by using the following command:
sudo i2cdetect -y 1
### Download and install bpbme280 ion service
Download the needed code using this command:
```
cd /home/pi/dtn
git clone https://github.com/samograsic/bpbme280.git
```
Install dependencies:
```
sudo apt-get install i2c-tools
```
Compilie the code:
```
cd bpbme280
make
sudo make install
```
Now you should be able to run the program, simply by typing
```
//Basic (defaults: TTL=300s, i2c=/dev/i2c-1, addr=0x76)
./bpbme280 ipn:YOUR_IPN.1.1 ipn:268484800.6
///With location
./bpbme280 ipn:YOUR_IPN.1 ipn:268484800.6 -locLaboratory_A
```
2. Using cron job to automatically send data every hour
Edit the root crontab:
```
sudo crontab -e
```
Add the line (NOTE: Change the NNN to match you ipn):
```
0 * * * * cd /home/pi/dtn && /usr/local/bin/bpbme280 ipn:268485NNN.1 ipn:268484800.6 -t600 -locLaboratory_A >>/var/log/bpbme280.log 2>&1
```
### Verify Data Reception IPNSIG's Bundle Board
Open the follwing page and check if you sensor's data gets displayed on IPNSIG's Bundle Board!

Link to IPNSIG's Bundle board: [https://openipn.org/bundleboard/](https://openipn.org/bundleboard/)
Note: IPNSIG's Bundle board will automatically display every bundle that gets sent to the ipn:268484800.6 endopoint. It can display binary data in hex format, strings, JSON and CBOR (JSON and CBOR formats that get formated)
## Other notes:
###How to change your WIFI network
To change your wifi SSID use command:
```
nmcli connection show
sudo nmcli connection modify "preconfigured" 802-11-wireless.ssid "DTNWorkshop"
sudo nmcli connection modify "preconfigured" wifi-sec.psk "bundle2025"
sudo nmcli connection down "preconfigured" && nmcli connection up "preconfigured"
```